Guide to GIGA R1 Advanced ADC/DAC and Audio Features
Learn how to use the ADC/DAC features, along with useful examples on how to generate waveforms and play audio from a file.
In the GIGA R1, you can find the powerful STM32H747XI, a dual-core 32-bit Arm® Cortex® microcontroller from STMicroelectronics; this is the same microcontroller found in the Portenta H7 board.
In this guide, we will focus on the advanced ADC/DAC features, utilizing the Arduino_AdvancedAnalog library. The examples found in this guide can be used to:
- Set up and read ADCs with specific parameters (resolution, sample rate, number of samples per channel, queue depth).
- Set up and write to a DAC channel with specific parameters (resolution, frequency, number of samples per channel, queue depth).
- Generate specific waveforms through input via serial commands (triangle, square, sine, sawtooth waves) as well as adjusting the frequency.
- Read and play audio files (
) from a USB stick (connected to USB-A) to a speaker, using the audio jack..wav
Important note: the GIGA R1 does NOT have an amplifying circuit onboard. Connecting speakers that does not have an amplifier can damage the DAC and the board itself.
Hardware & Software Needed
And for specific examples:
- USB Mass Storage Device (USB Stick).
- Auxiliary Cable.
- Speaker with a built-in amplifier.
ADC/DAC Pins and Connectors
The GIGA gives you access to more pins than any other Arduino board accessible for makers. Many have unique features; we will focus on the pins that have audio features or can be used for developing audio applications. Audio pins and connectors in the GIGA can be divided into three important groups:
- Analog-to-Digital Converters (ADC) pins
- Digital-to-Analog Converters (DAC) pins
- Tip, Ring, Ring, Sleeve (TRRS) 3.5mm jack
The image below shows the position of the audio pins and connectors of the GIGA R1:
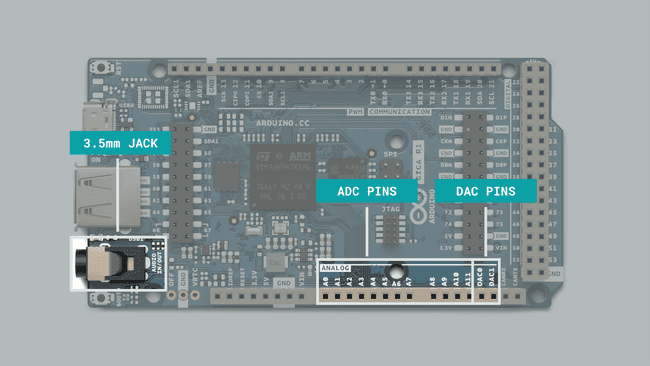
The table below explains the full functionality of the listed on it; notice that some pins have more than one functionality, such as
DAC0DAC1CANRXCANTX| Pin | Functionality |
|---|---|
| A0 | ADC |
| A1 | ADC |
| A2 | ADC |
| A3 | ADC |
| A4 | ADC |
| A5 | ADC |
| A6 | ADC |
| A7 | ADC |
| A8 | ADC |
| A9 | ADC |
| A10 | ADC |
| A11 | ADC |
| DAC0 | ADC and DAC |
| DAC1 | ADC and DAC |
| CANRX | ADC and CAN RX |
| CANTX | ADC and CAN TX |
Pins
A7DAC0DAC1DAC0DAC1A7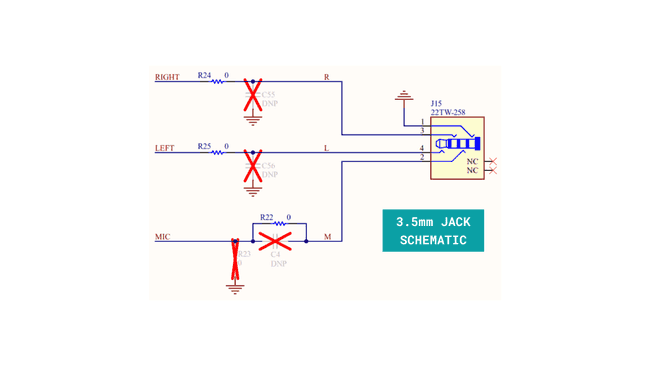
Analog-to-Digital Converter (ADC)
An analog-to-digital converter (ADC) is a device that converts an analog voltage, or signal, into digital data. The GIGA R1 microcontroller, the STM32H747XI, embeds three ADCs whose resolution can be configured to 8, 10, 12, 14, or 16 bits. Each ADC shares up to 20 external channels that can be accessed in the GIGA R1 board through pins
A0A1A2A3A4A5A6A7A8A9A10A11DAC0DAC1CANRXCANTX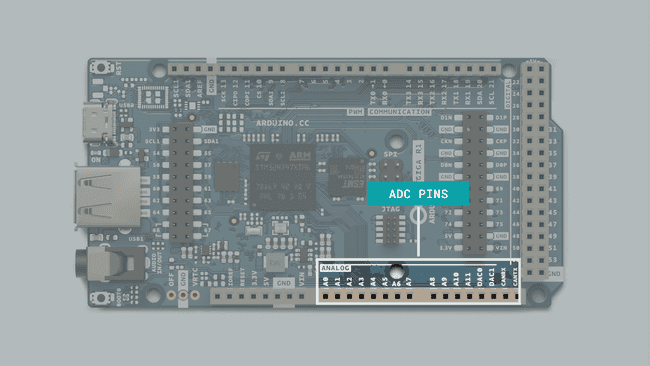
A7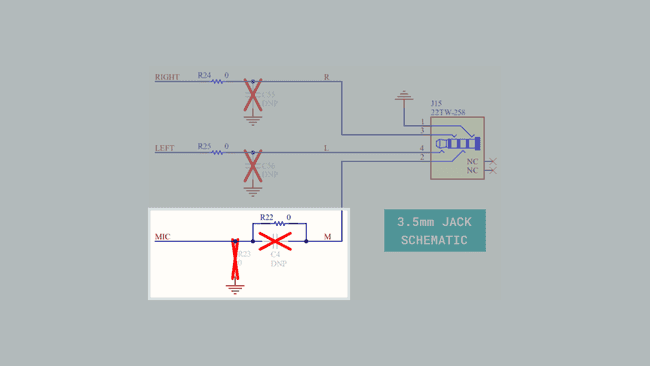
The GIGA R1 ADCs can be used with the built-in analog input/output functions of the Arduino programming language, though they only provide the basic functionalities of the ADCs. To use all of the capabilities of the DACs from the GIGA R1, we can use the Arduino_AdvancedAnalog library from Arduino. Let's check some interesting examples that show some capabilities of the GIGA R1 ADCs!
Multi Channel ADC
The following example code show how to use two GIGA R1 ADCs simultaneously with the Arduino_AdvancedAnalog library from Arduino:
1// This example shows how to use 2 ADC simultaneously.2#include <Arduino_AdvancedAnalog.h>3
4AdvancedADC adc1(A0);5AdvancedADC adc2(A1);6uint64_t last_millis = 0;7
8void setup() {9 Serial.begin(9600);10
11 // Resolution, sample rate, number of samples per channel, queue depth.12 if (!adc1.begin(AN_RESOLUTION_16, 16000, 32, 64)) {13 Serial.println("Failed to start analog acquisition!");14 while (1);15 }16
17 if (!adc2.begin(AN_RESOLUTION_16, 8000, 32, 64)) {18 Serial.println("Failed to start analog acquisition!");19 while (1);20 }21}22
23void adc_print_buf(AdvancedADC &adc) {24 if (adc.available()) {25 SampleBuffer buf = adc.read();26
27 // Print first sample.28 Serial.println(buf[0]);29
30 // Release the buffer to return it to the pool.31 buf.release();32 }33}34
35void loop() {36 if (millis() - last_millis > 1) {37 adc_print_buf(adc1);38 adc_print_buf(adc2);39 last_millis = millis();40 }41}ADC Serial Plotter Example
The following example code shows how to use two GIGA R1 ADCs simultaneously with the Arduino_AdvancedAnalog library from Arduino and displays the readings via the Serial Plotter of the Arduino IDE:
1#include <Arduino_AdvancedAnalog.h>2
3AdvancedADC adc(A0, A1);4uint64_t last_millis = 0;5
6void setup() {7 Serial.begin(9600);8
9 // Resolution, sample rate, number of samples per channel, queue depth.10 if (!adc.begin(AN_RESOLUTION_16, 16000, 32, 128)) {11 Serial.println("Failed to start analog acquisition!");12 while (1);13 }14}15
16void loop() {17 if (adc.available()) {18 SampleBuffer buf = adc.read();19 // Process the buffer.20 if ((millis() - last_millis) > 20) {21 Serial.println(buf[0]); // Sample from first channel22 Serial.println(buf[1]); // Sample from second channel23 last_millis = millis();24 }25 // Release the buffer to return it to the pool.26 buf.release();27 }28}Digital-to-Analog Converters (DAC)
A digital-to-analog converter (DAC) is a device that has a function opposite to that of the analog-to-digital converter (ADC); a DAC converts digital data to an analog voltage. The GIGA R1 microcontroller, the STM32H747XI, features two 12-bit buffered DAC channels that can convert two digital signals into two analog voltage signals. Some of the features of the DACs found in the GIGA R1 are the following:
- 8-bit or 12-bit monotonic output
- Left or right data alignment in 12-bit mode
- Dual DAC channel independent or simultaneous conversions
- DMA capability for each channel
- External triggers for conversion
- Input voltage reference or internal voltage reference
- Analog waveform generation
The GIGA R1 DACs are named
DAC0DAC1A12A13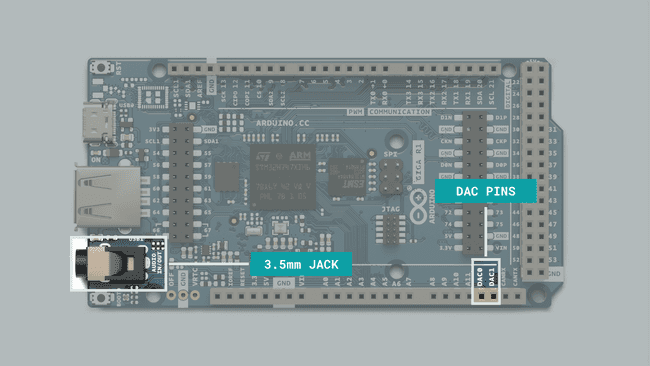
Besides pins
A12A13DAC0DAC1DAC0DAC1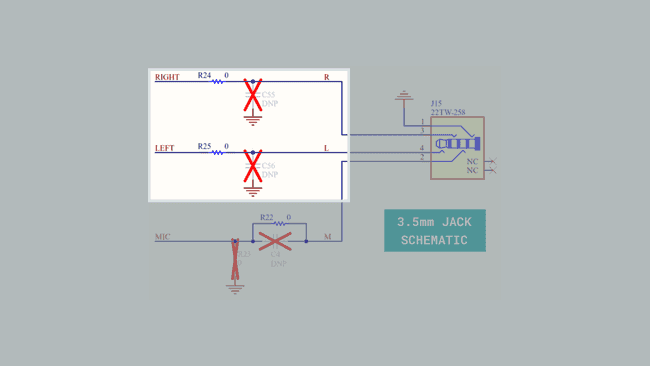
Waveform Generation with the GIGA R1 DACs
Waveform generation is an exciting application used in audio systems, for example, synthesizers, for audio signal generation.
The following example shows how to output an 8kHz square wave on
DAC01// This example outputs an 8KHz square wave on A12/DAC0.2#include <Arduino_AdvancedAnalog.h>3
4AdvancedDAC dac0(A12);5
6void setup() {7 Serial.begin(9600);8
9 while (!Serial) {10
11 }12
13 if (!dac0.begin(AN_RESOLUTION_12, 8000, 32, 64)) {14 Serial.println("Failed to start DAC0 !");15 while (1);16 }17}18
19void dac_output_sq(AdvancedDAC &dac_out) {20 if (dac_out.available()) {21
22 // Get a free buffer for writing.23 SampleBuffer buf = dac_out.dequeue();24
25 // Write data to buffer.26 for (int i=0; i<buf.size(); i++) {27 buf.data()[i] = (i % 2 == 0) ? 0: 0xfff;28 }29
30 // Write the buffer to DAC.31 dac_out.write(buf);32 }33}34
35void loop() {36 dac_output_sq(dac0);37}DAC Multi Channel Square Waves
It is also possible to simultaneously output at both DAC channels,
DAC0DAC1DAC0DAC11// This example outputs an 8KHz square wave on A12/DAC0 and 16KHz square wave on ADC13/DAC1.2#include <Arduino_AdvancedAnalog.h>3
4AdvancedDAC dac0(A12);5AdvancedDAC dac1(A13);6
7void setup() {8 Serial.begin(9600);9
10 while (!Serial) {11
12 }13
14 if (!dac0.begin(AN_RESOLUTION_12, 8000, 32, 64)) {15 Serial.println("Failed to start DAC0 !");16 while (1);17 }18
19 if (!dac1.begin(AN_RESOLUTION_12, 16000, 32, 64)) {20 Serial.println("Failed to start DAC1 !");21 while (1);22 }23}24
25void dac_output_sq(AdvancedDAC &dac_out) {26 if (dac_out.available()) {27 28 // Get a free buffer for writing.29 SampleBuffer buf = dac_out.dequeue();30 31 // Write data to buffer.32 for (int i=0; i<buf.size(); i++) {33 buf.data()[i] = (i % 2 == 0) ? 0: 0xfff;34 }35 36 // Write the buffer to DAC.37 dac_out.write(buf);38 }39}40
41void loop() {42 dac_output_sq(dac0);43 dac_output_sq(dac1);44}DAC Sine Wave
A 32kHz sine wave output on
DAC01// This example outputs a 32KHz sine wave on A12/DAC1.2#include <Arduino_AdvancedAnalog.h>3
4AdvancedDAC dac0(A12);5
6uint16_t lut[] = {7 0x0800,0x08c8,0x098f,0x0a52,0x0b0f,0x0bc5,0x0c71,0x0d12,0x0da7,0x0e2e,0x0ea6,0x0f0d,0x0f63,0x0fa7,0x0fd8,0x0ff5,8 0x0fff,0x0ff5,0x0fd8,0x0fa7,0x0f63,0x0f0d,0x0ea6,0x0e2e,0x0da7,0x0d12,0x0c71,0x0bc5,0x0b0f,0x0a52,0x098f,0x08c8,9 0x0800,0x0737,0x0670,0x05ad,0x04f0,0x043a,0x038e,0x02ed,0x0258,0x01d1,0x0159,0x00f2,0x009c,0x0058,0x0027,0x000a,10 0x0000,0x000a,0x0027,0x0058,0x009c,0x00f2,0x0159,0x01d1,0x0258,0x02ed,0x038e,0x043a,0x04f0,0x05ad,0x0670,0x073711};12
13static size_t lut_size = sizeof(lut) / sizeof(lut[0]);14
15void setup() {16 Serial.begin(9600);17 if (!dac0.begin(AN_RESOLUTION_12, 32000 * lut_size, 64, 128)) {18 Serial.println("Failed to start DAC1 !");19 while (1);20 }21}22
23void loop() {24 static size_t lut_offs = 0;25
26 if (dac0.available()) {27 // Get a free buffer for writing.28 SampleBuffer buf = dac0.dequeue();29
30 // Write data to buffer.31 for (size_t i=0; i<buf.size(); i++, lut_offs++) {32 buf[i] = lut[lut_offs % lut_size];33 }34
35 // Write the buffer to DAC.36 dac0.write(buf);37 }38}Waveform Generation Based on Input
The following example allows you to switch between several waveforms via a serial interface. Uploading the example will allow you to change it based on the character input.
: generatestriangle wavet
: square waveq
: sine waves
: sawtooth waver
: increase frequency+
: decrease frequency-
1// This example generates different waveforms based on user input on A12/DAC1.2
3#include <Arduino_AdvancedAnalog.h>4
5#define N_SAMPLES (256)6#define DEFAULT_FREQUENCY (16000)7
8AdvancedDAC dac0(A12);9uint8_t SAMPLES_BUFFER[N_SAMPLES];10size_t dac_frequency = DEFAULT_FREQUENCY;11
12void generate_waveform(int cmd) 13{ 14 switch (cmd) {15 case 't':16 // Triangle wave17 Serial.print("Waveform: Triangle ");18 for (int i=0; i<N_SAMPLES; i++){19 SAMPLES_BUFFER[i] = abs((i % 255) - 127);20 }21 break;22
23 case 'q':24 // Square wave25 Serial.print("Waveform: Square ");26 for (int i=0; i<N_SAMPLES; i++){27 SAMPLES_BUFFER[i] = (i % 255) < 127 ? 127 : 0;28 }29 break;30
31 case 's':32 // Sine wave33 Serial.print("Waveform: Sine ");34 for (int i=0; i<N_SAMPLES; i++){35 SAMPLES_BUFFER[i] = sin(2 * 3.14 * (i / (float) N_SAMPLES)) * 127 + 127;36 }37 break;38
39 case 'r':40 // Sawtooth41 Serial.print("Waveform: Sawtooth");42 for (int i=0; i<N_SAMPLES; i++){43 SAMPLES_BUFFER[i] = i;44 }45 break;46
47 case '+':48 case '-':49 Serial.print("Current frequency: ");50 51 if (cmd == '+' && dac_frequency < 64000) {52 dac_frequency *= 2;53 } else if (cmd == '-' && dac_frequency > 1000) {54 dac_frequency /= 2;55 } else {56 break;57 }58 59 dac0.stop();60 delay(500);61 if (!dac0.begin(AN_RESOLUTION_8, dac_frequency * N_SAMPLES, N_SAMPLES, 32)) {62 Serial.println("Failed to start DAC1 !");63 }64 delay(500);65 break;66 67 default:68 Serial.print("Unknown command ");69 Serial.println((char) cmd);70 return;71 }72 73 Serial.print(dac_frequency/1000);74 Serial.println("KHz");75}76
77void setup() {78 Serial.begin(115200);79
80 while (!Serial) {81
82 }83
84 85 Serial.println("Enter a command:");86 Serial.println("t: Triangle wave");87 Serial.println("q: Square wave");88 Serial.println("s: Sine wave");89 Serial.println("r: Sawtooth wave");90 Serial.println("+: Increase frequency");91 Serial.println("-: Decrease frequency");92 93 generate_waveform('s');94 95 // DAC initialization96 if (!dac0.begin(AN_RESOLUTION_8, DEFAULT_FREQUENCY * N_SAMPLES, N_SAMPLES, 32)) {97 Serial.println("Failed to start DAC1 !");98 while (1);99 }100}101
102void loop() {103 if (Serial.available() > 0) {104 int cmd = Serial.read();105 if (cmd != '\n') {106 generate_waveform(cmd);107 }108 } 109 110 if (dac0.available()) {111 // Get a free buffer for writing.112 SampleBuffer buf = dac0.dequeue();113
114 // Write data to buffer.115 for (size_t i=0; i<buf.size(); i++) {116 buf[i] = SAMPLES_BUFFER[i];117 }118
119 dac0.write(buf);120 }121}Audio Playback
The GIGA R1 12-bit DAC channels can also be used to read
.wavFor this example, you will need:
- A speaker, that has a built in amplifier.
- A USB mass storage device (USB stick).*
- Arduino_USBHostMbed5 library installed.
*USB mass storage devices connected needs to be formatted with the FAT32 as a file system, using the MBR partitioning scheme. Read more in the USB Mass Storage section.
USB Stick Configuration
The Arduino_AdvancedAnalog library contains the necessary functions that enable us to use the advanced capabilities of the GIGA R1 DACs.
To read
.wavUSB_DRIVE1mbed::FATFileSystem usb("USB_DRIVE");Another line of code defines the audio file to be played. Here we need to write the name of the
.wav/USB_DRIVE1file = fopen("/USB_DRIVE/AUDIO_SAMPLE.wav", "rb");Play Single Audio File
The following example plays a single
.wavAUDIO_SAMPLE.wavUSB_DRIVEThe file is read, processed and writes the values to a buffer, which is then outputted via the DAC0 channel. The DAC0 channel is connected to the 3.5mm audio jack, and when connecting it to a speaker, it will play the file once.
Note that to start the sketch, you need to open Serial Monitor due to the
while(!Serial)setup()1/*2 * GIGA R1 - Audio Playback3 * Simple wav format audio playback via 12-Bit DAC output by reading from a USB drive.4 * In order for this sketch to work you need to rename 'USB_DRIVE' to the name of your USB stick drive.5 * Furthermore you need to store the provided audio file AUDIO_SAMPLE.wav on it.6*/7
8#include <Arduino_AdvancedAnalog.h>9#include <DigitalOut.h>10#include <Arduino_USBHostMbed5.h>11#include <FATFileSystem.h>12
13AdvancedDAC dac0(A12);14
15USBHostMSD msd;16mbed::FATFileSystem usb("USB_DRIVE");17
18FILE * file = nullptr;19int sample_size = 0;20int samples_count = 0;21
22
23void setup()24{25 Serial.begin(115200);26 while (!Serial);27
28 /* Enable power for HOST USB connector. */29 pinMode(PA_15, OUTPUT);30 digitalWrite(PA_15, HIGH);31
32 Serial.println("Please connect a USB stick to the GIGA's USB port ...");33 while (!msd.connect()) delay(100);34
35 Serial.println("Mounting USB device ...");36 int const rc_mount = usb.mount(&msd);37 if (rc_mount)38 {39 Serial.print("Error mounting USB device ");40 Serial.println(rc_mount);41 return;42 }43
44 Serial.println("Opening audio file ...");45
46 /* 16-bit PCM Mono 16kHz realigned noise reduction */47 file = fopen("/USB_DRIVE/AUDIO_SAMPLE.wav", "rb");48 if (file == nullptr)49 {50 Serial.print("Error opening audio file: ");51 Serial.println(strerror(errno));52 return;53 }54
55 Serial.println("Reading audio header ...");56 struct wav_header_t57 {58 char chunkID[4]; //"RIFF" = 0x4646495259 unsigned long chunkSize; //28 [+ sizeof(wExtraFormatBytes) + wExtraFormatBytes] + sum(sizeof(chunk.id) + sizeof(chunk.size) + chunk.size)60 char format[4]; //"WAVE" = 0x4556415761 char subchunk1ID[4]; //"fmt " = 0x20746D6662 unsigned long subchunk1Size; //16 [+ sizeof(wExtraFormatBytes) + wExtraFormatBytes]63 unsigned short audioFormat;64 unsigned short numChannels;65 unsigned long sampleRate;66 unsigned long byteRate;67 unsigned short blockAlign;68 unsigned short bitsPerSample;69 };70
71 wav_header_t header;72 fread(&header, sizeof(header), 1, file);73
74 Serial.println("WAV File Header read:");75 char msg[64] = {0};76 snprintf(msg, sizeof(msg), "File Type: %s", header.chunkID);77 Serial.println(msg);78 snprintf(msg, sizeof(msg), "File Size: %ld", header.chunkSize);79 Serial.println(msg);80 snprintf(msg, sizeof(msg), "WAV Marker: %s", header.format);81 Serial.println(msg);82 snprintf(msg, sizeof(msg), "Format Name: %s", header.subchunk1ID);83 Serial.println(msg);84 snprintf(msg, sizeof(msg), "Format Length: %ld", header.subchunk1Size);85 Serial.println(msg);86 snprintf(msg, sizeof(msg), "Format Type: %hd", header.audioFormat);87 Serial.println(msg);88 snprintf(msg, sizeof(msg), "Number of Channels: %hd", header.numChannels);89 Serial.println(msg);90 snprintf(msg, sizeof(msg), "Sample Rate: %ld", header.sampleRate);91 Serial.println(msg);92 snprintf(msg, sizeof(msg), "Sample Rate * Bits/Sample * Channels / 8: %ld", header.byteRate);93 Serial.println(msg);94 snprintf(msg, sizeof(msg), "Bits per Sample * Channels / 8: %hd", header.blockAlign);95 Serial.println(msg);96 snprintf(msg, sizeof(msg), "Bits per Sample: %hd", header.bitsPerSample);97 Serial.println(msg);98
99 /* Find the data section of the WAV file. */100 struct chunk_t101 {102 char ID[4];103 unsigned long size;104 };105
106 chunk_t chunk;107 snprintf(msg, sizeof(msg), "id\t" "size");108 Serial.println(msg);109 /* Find data chunk. */110 while (true)111 {112 fread(&chunk, sizeof(chunk), 1, file);113 snprintf(msg, sizeof(msg), "%c%c%c%c\t" "%li", chunk.ID[0], chunk.ID[1], chunk.ID[2], chunk.ID[3], chunk.size);114 Serial.println(msg);115 if (*(unsigned int *) &chunk.ID == 0x61746164)116 break;117 /* Skip chunk data bytes. */118 fseek(file, chunk.size, SEEK_CUR);119 }120
121 /* Determine number of samples. */122 sample_size = header.bitsPerSample / 8;123 samples_count = chunk.size * 8 / header.bitsPerSample;124 snprintf(msg, sizeof(msg), "Sample size = %i", sample_size); Serial.println(msg);125 snprintf(msg, sizeof(msg), "Samples count = %i", samples_count); Serial.println(msg);126
127 /* Configure the advanced DAC. */128 if (!dac0.begin(AN_RESOLUTION_12, header.sampleRate * 2, 256, 16))129 {130 Serial.println("Failed to start DAC1 !");131 return;132 }133}134
135void loop()136{137 if (dac0.available() && !feof(file))138 {139 /* Read data from file. */140 uint16_t sample_data[256] = {0};141 fread(sample_data, sample_size, 256, file);142
143 /* Get a free buffer for writing. */144 SampleBuffer buf = dac0.dequeue();145
146 /* Write data to buffer. */147 for (size_t i = 0; i < buf.size(); i++)148 {149 /* Scale down to 12 bit. */150 uint16_t const dac_val = ((static_cast<unsigned int>(sample_data[i])+32768)>>4) & 0x0fff;151 buf[i] = dac_val;152 }153
154 /* Write the buffer to DAC. */155 dac0.write(buf);156 }157}Loop Multiple Audio Files
This example is similar to the Play Single Audio File example, but with some key changes:
- This example uses multiple audio files.
- The file read is moved to a separate function,
, as it will be continuously called from the sketch.configFile() - Instead of playing a file once, it keeps looping it.
- The BOOT0 (
) button (right next to the audio jack) is used as a regular pushbutton to loop through the audio files.PC_13 - Pressing the button changes the file played.
The files used are called
DRUM.wavWARP.wavBASS.wavSHAKE.wavYou can download them from this link.
1/*2 * GIGA R1 - Audio Playback3 * Simple wav format audio playback via 12-Bit DAC output by reading from a USB drive.4 * In order for this sketch to work you need to rename 'USB_DRIVE' to the name of your USB stick drive.5 * Furthermore you need to store the provided audio file AUDIO_SAMPLE.wav on it.6*/7
8#include <Arduino_AdvancedAnalog.h>9#include <DigitalOut.h>10#include <Arduino_USBHostMbed5.h>11#include <FATFileSystem.h>12
13AdvancedDAC dac0(A12);14
15USBHostMSD msd;16mbed::FATFileSystem usb("usb");17
18FILE *file = nullptr;19int sample_size = 0;20int samples_count = 0;21
22int swapFile;23
24void setup() {25 Serial.begin(115200);26 while (!Serial)27 ;28
29 /* Enable power for HOST USB connector. */30
31 pinMode(PA_15, OUTPUT);32 digitalWrite(PA_15, HIGH);33
34 Serial.println("Please connect a USB stick to the GIGA's USB port ...");35 while (!msd.connect()) delay(100);36
37 Serial.println("Mounting USB device ...");38 int const rc_mount = usb.mount(&msd);39 if (rc_mount) {40 Serial.print("Error mounting USB device ");41 Serial.println(rc_mount);42 return;43 }44 configFile();45}46
47void loop() {48 if (dac0.available() && !feof(file)) {49 /* Read data from file. */50 uint16_t sample_data[256] = { 0 };51 fread(sample_data, sample_size, 256, file);52
53 /* Get a free buffer for writing. */54 SampleBuffer buf = dac0.dequeue();55
56 /* Write data to buffer. */57 for (size_t i = 0; i < buf.size(); i++) {58 /* Scale down to 12 bit. */59 uint16_t const dac_val = ((static_cast<unsigned int>(sample_data[i]) + 32768) >> 4) & 0x0fff;60 buf[i] = dac_val;61 }62
63 /* Write the buffer to DAC. */64 dac0.write(buf);65
66 if(feof(file)){67 fclose(file);68 configFile();69 }70 }71
72 int buttonState = digitalRead(PC_13);73
74 if (buttonState == 1) {75 swapFile = swapFile + 1;76 if (swapFile == 4) {77 swapFile = 0;78 }79 delay(500);80 configFile();81 }82}83
84
85void configFile() {86 Serial.println("Opening audio file ...");87
88 /* 16-bit PCM Mono 16kHz realigned noise reduction */89 if (swapFile == 0) {90 file = fopen("/usb/DRUM.wav", "rb");91 } else if (swapFile == 1) {92 file = fopen("/usb/WARP.wav", "rb");93 } else if (swapFile == 2) {94 file = fopen("/usb/BASS.wav", "rb");95 } else if (swapFile == 3) {96 file = fopen("/usb/SHAKE.wav", "rb");97 }98
99 if (file == nullptr) {100 Serial.print("Error opening audio file: ");101 Serial.println(strerror(errno));102 return;103 }104
105 Serial.println("Reading audio header ...");106 struct wav_header_t {107 char chunkID[4]; //"RIFF" = 0x46464952108 unsigned long chunkSize; //28 [+ sizeof(wExtraFormatBytes) + wExtraFormatBytes] + sum(sizeof(chunk.id) + sizeof(chunk.size) + chunk.size)109 char format[4]; //"WAVE" = 0x45564157110 char subchunk1ID[4]; //"fmt " = 0x20746D66111 unsigned long subchunk1Size; //16 [+ sizeof(wExtraFormatBytes) + wExtraFormatBytes]112 unsigned short audioFormat;113 unsigned short numChannels;114 unsigned long sampleRate;115 unsigned long byteRate;116 unsigned short blockAlign;117 unsigned short bitsPerSample;118 };119
120 wav_header_t header;121 fread(&header, sizeof(header), 1, file);122
123 Serial.println("WAV File Header read:");124 char msg[64] = { 0 };125 snprintf(msg, sizeof(msg), "File Type: %s", header.chunkID);126 Serial.println(msg);127 snprintf(msg, sizeof(msg), "File Size: %ld", header.chunkSize);128 Serial.println(msg);129 snprintf(msg, sizeof(msg), "WAV Marker: %s", header.format);130 Serial.println(msg);131 snprintf(msg, sizeof(msg), "Format Name: %s", header.subchunk1ID);132 Serial.println(msg);133 snprintf(msg, sizeof(msg), "Format Length: %ld", header.subchunk1Size);134 Serial.println(msg);135 snprintf(msg, sizeof(msg), "Format Type: %hd", header.audioFormat);136 Serial.println(msg);137 snprintf(msg, sizeof(msg), "Number of Channels: %hd", header.numChannels);138 Serial.println(msg);139 snprintf(msg, sizeof(msg), "Sample Rate: %ld", header.sampleRate);140 Serial.println(msg);141 snprintf(msg, sizeof(msg), "Sample Rate * Bits/Sample * Channels / 8: %ld", header.byteRate);142 Serial.println(msg);143 snprintf(msg, sizeof(msg), "Bits per Sample * Channels / 8: %hd", header.blockAlign);144 Serial.println(msg);145 snprintf(msg, sizeof(msg), "Bits per Sample: %hd", header.bitsPerSample);146 Serial.println(msg);147
148 /* Find the data section of the WAV file. */149 struct chunk_t {150 char ID[4];151 unsigned long size;152 };153
154 chunk_t chunk;155 snprintf(msg, sizeof(msg), "id\t"156 "size");157 Serial.println(msg);158 /* Find data chunk. */159 while (true) {160 fread(&chunk, sizeof(chunk), 1, file);161 snprintf(msg, sizeof(msg), "%c%c%c%c\t"162 "%li",163 chunk.ID[0], chunk.ID[1], chunk.ID[2], chunk.ID[3], chunk.size);164 Serial.println(msg);165 if (*(unsigned int *)&chunk.ID == 0x61746164)166 break;167 /* Skip chunk data bytes. */168 fseek(file, chunk.size, SEEK_CUR);169 }170
171 /* Determine number of samples. */172 sample_size = header.bitsPerSample / 8;173 samples_count = chunk.size * 8 / header.bitsPerSample;174 snprintf(msg, sizeof(msg), "Sample size = %i", sample_size);175 Serial.println(msg);176 snprintf(msg, sizeof(msg), "Samples count = %i", samples_count);177 Serial.println(msg);178
179 /* Configure the advanced DAC. */180 if (!dac0.begin(AN_RESOLUTION_12, header.sampleRate, 256, 16)) {181 Serial.println("Failed to start DAC1 !");182 return;183 }184}Pulse Density Modulation Support
Pulse Density Support (PDM) is a form of modulation used to represent analog information into digital information; PDM uses a high-frequency stream of 1-bit digital samples. In PDM, a large cluster of ones represents a positive amplitude, while a large cluster of zeros represents a negative amplitude.
The GIGA R1 PDM support can be used with the built-in PDM library. Let's check an interesting example that shows of how to read a PDM microphone wwith the GIGA R1:
1#include <PDM.h>2
3// Default number of output channels4static const char channels = 1;5
6// Default PCM output frequency7static const int frequency = 16000;8
9// Buffer to read samples into, each sample is 16-bits10short sampleBuffer[128];11
12// Number of audio samples read13volatile int samplesRead;14
15void setup() {16 Serial.begin(9600);17 while (!Serial);18
19 // Configure the callback function and gain20 PDM.onReceive(onPDMdata);21 PDM.setGain(30);22
23 // Initialize PDM microphone in mono mode, and a 16 kHz sample rate:24 if (!PDM.begin(channels, frequency)) {25 Serial.println("Failed to start PDM!");26 while (1);27 }28}29
30void loop() {31 // Wait for samples to be read32 if (samplesRead) {33
34 // Print samples to the Serial Monitor35 for (int i = 0; i < samplesRead; i++) {36 if(channels == 2) {37 Serial.print("L:");38 Serial.print(sampleBuffer[i]);39 Serial.print(" R:");40 i++;41 }42 Serial.println(sampleBuffer[i]);43 }44
45 samplesRead = 0;46 }47}48
49// Callback function50void onPDMdata() {51 int bytesAvailable = PDM.available();52 PDM.read(sampleBuffer, bytesAvailable);53 samplesRead = bytesAvailable / 2;54}Suggest changes
The content on docs.arduino.cc is facilitated through a public GitHub repository. If you see anything wrong, you can edit this page here.
License
The Arduino documentation is licensed under the Creative Commons Attribution-Share Alike 4.0 license.