Arduino UNO R4 WiFi Cheat Sheet
Learn how to set up the Arduino UNO R4 WiFi, the fourth revision of our most popular and important development board.
The Arduino UNO is our most popular and globally recognized development board, and has become a staple in the maker community and education since its release. The Arduino UNO R4 WiFi board is part of the 4th revision of UNO boards, and the first to feature a 32-bit MCU (RA4M1 series from Renesas).
This document serves as a technical overview for the UNO R4 WiFi, where you will a collection of links to resources and guides to help you get started with your next project.
The ESP32 module and the Renesas RA4M1-chip are part of a sophisticated USB-Serial system that is highly flexible and adaptive to allow for HID features while still keeping the ability to program both the main MCU, and the ESP32, if you so wish (although this is an advanced option and requires some hacking).
The on board ESP32 module is by default running firmware that handles connectivity for the UNO R4 WiFi. You may need to update this firmware to enable new features, or resolve bugs and other issues. There are a few methods of updating this firmware, and you can find them all detailed in our Help Center article.
You can also visit the documentation platform for the Arduino UNO R4 WiFi.
Datasheet
The full datasheet is available as a downloadable PDF from the link below:
Power Supply
The board can be powered via the VIN pin, supporting a range between 6-24 V.The VIN pin is also connected to the DC-jack (barrel plug connector).
When powered via the VIN pin, you are using the onboard regulator to bring down the voltage to 5V, which means that the 5 V pin can provide up to 1.2 A. Keep in mind that this voltage regulator also powers the rest of the circuit board, including the MCU, LEDs among other components.
External devices with a high current draw (e.g. servo motors) should never be powered via the 5 V pin. It is mainly intended for devices drawing lower current such as sensor modules.
If you’re using the USB-C® connector you must power it with 5 V.
When powered via USB, you are bypassing the onboard voltage regulator completely. In this case, the 5 V pin can provide up to 2 A without damaging the board.
Board Package
The UNO R4 WiFi is based on the Arduino UNO R4 Board Package.
Installation
The UNO R4 WiFi can be programmed either via the Arduino IDE, Arduino Web Editor or Arduino CLI.
Arduino IDE
To use the board in the Arduino IDE, you need to install the latest version of the Arduino UNO R4 Boards package from the boards manager.
Read more in the Getting Started with the UNO R4 WiFi guide.
Arduino Web Editor
The Web Editor is an online IDE that includes all official boards, no need for installing the Board Package. You will need the Create Plugin installed on your computer to use the Web Editor.
Read more in the Getting Started with the Web Editor guide.
Arduino Cloud
The Arduino UNO R4 WiFi is compatible with the Arduino Cloud, a Cloud service that allows you to create IoT applications in just minutes.
Visit the Getting Started with Arduino Cloud guide for more information.
Renesas RA4M1
The UNO R4 WiFi features the powerful and very robust Renesas microcontroller also found on the UNO R4 Minima. Renesas microcontrollers are known for their high performance and robustness, including their built-in peripheral set.
These peripherals include analog-to-digital converters, timers, pulse width modulation (PWM) units, communication interfaces (such as UART, SPI, and I2C) and more.
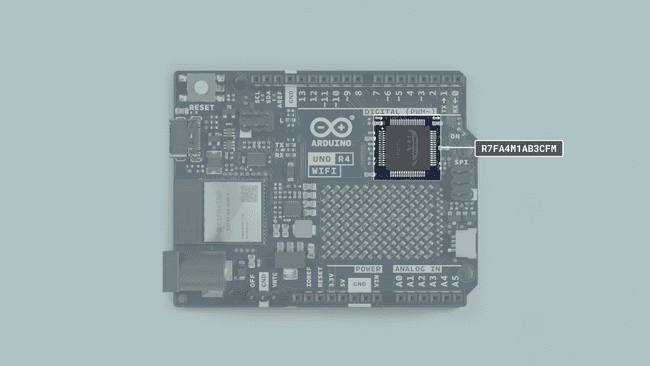
Memory
The board features
- 32 kB of SRAM
- 256 kB flash
- 8 kB data (EEPROM).
Pins
The UNO R4 WiFi gives you access to many different pins and many of them have special features that will be accounted for in the upcoming sections of this article. Keep reading to learn what you can do with them.
If you just need a quick overview of the pins functionality, this is a full table of all the IO pins on the UNO R4 WiFi.
| Pin | Type | Function |
|---|---|---|
| D0 | Digital | UART Receive |
| D1 | Digital | UART Transmit |
| D2 | Digital | GPIO pin, Interrupt |
| D3 | Digital | GPIO pin, Interrupt, PWM |
| D4 | Digital | GPIO pin |
| D5 | Digital | GPIO pin, PWM |
| D6 | Digital | GPIO pin, PWM |
| D7 | Digital | GPIO pin |
| D8 | Digital | GPIO pin |
| D9 | Digital | GPIO pin, PWM |
| D10 | Digital | SPI (CS), GPIO pin, PWM |
| D11 | Digital | SPI (COPI), GPIO pin, PWM |
| D12 | Digital | SPI (CIPO), GPIO pin |
| D13 | Digital | SPI (SCK), GPIO pin, Built-in LED |
| A0 | Analog | Analog In, DAC OUT |
| A1 | Analog in | Analog In, OPAMP + |
| A2 | Analog in | Analog In, OPAMP - |
| A3 | Analog | Analog In, OPAMP OUT |
| A4 | Analog in | Analog In, SDA* |
| A5 | Analog in | Analog In, SCL* |
*A4 and A5 pins are both connected to the same I2C bus.
Analog Pins
The UNO R4 WiFi has six analog input pins (A0-A5) that can be read by using the
analogRead()| Pin | Type | Function |
|---|---|---|
| A0 | Analog | Analog In, DAC |
| A1 | Analog | Analog In, OPAMP + |
| A2 | Analog | Analog In, OPAMP - |
| A3 | Analog | Analog In, OPAMP OUT |
| A4 | Analog | Analog In, SDA* |
| A5 | Analog | Analog In, SCL* |
*A4 and A5 pins are both connected to the same I2C bus.
1value = analogRead(pin);The default reference voltage of these pins is 5 V, but this can be changed as follows:
(Default reference of 5 V)analogReference(AR_DEFAULT)
(Built in reference of 1.5 V.)analogReference(AR_INTERNAL)
The default resolution is set to 10-bit, but can be updated to 12 and 14-bit resolutions. To do so, use the following method in the
setup()
(default)analogReadResolution(10)analogReadResolution(12)analogReadResolution(14)
To learn more about the ADC capabilities of the UNO R4 WiFi, check out the ADC-Resolution Guide.
OPAMP Pins
The RA4M1 has an internal OPAMP that is exposed on the UNO R4 WiFi as follows:
| Pin | OPAMP |
|---|---|
| A1 | OPAMP + |
| A2 | OPAMP - |
| A3 | OPAMP OUT |
Digital Pins
The UNO R4 WiFi features a total of digital 14 pins. Though some of them serve another purpose and shouldn't be used for GPIO if you have other pins available.
| Pin | Function | Notes |
|---|---|---|
| 0 | RX | Serial communication |
| 1 | TX | Serial communication |
| 2 | GPIO | Digital IO pin |
| 3 | PWM | Digital IO pin, PWM |
| 4 | GPIO | Digital IO pin |
| 5 | PWM | Digital IO pin, PWM |
| 6 | PWM | Digital IO pin, PWM |
| 7 | GPIO | Digital IO pin |
| 8 | GPIO | Digital IO pin |
| 9 | PWM | Digital IO pin, PWM |
| 10 | PWM | Digital IO pin, PWM |
| 11 | PWM | Digital IO pin, PWM |
| 12 | GPIO | Digital IO pin |
| 13 | GPIO | Digital IO pin |
The reference voltage of all digital pins is 5 V.
PWM
PWM (Pulse Width Modulation) capability allows a digital pin to emulate analog output by flickering on and off very fast letting you, among other things, dim LEDs connected to digital pins.
The UNO R4 WiFi supports PWM on pins marked with ~ on the headers. Officially supported pins are:
| Pin | RA4M1 | Timer |
|---|---|---|
| D3 | P105 | GTIOC1A |
| D5 | P107 | GTIOC0A |
| D6 | P111 | GTIOC3A |
| D9 | P303 | GTIOC7B |
| D10 | P103 | GTIOC2A |
| D11 | P411 | GTIOC6A |
You may use them as analog output pins with the function:
1analogWrite(pin, value);By default, the resolution is 8 bit (0-255), You can use
analogWriteResolution()1analogWriteResolution(resolution);Please note that the following pins are PWM capable but may interfere with other functionalities of the UNO R4 WiFi board. When writing library functions, please do not use this as they are not officially supported PWM pins.
| Pin | RA4M1 | Timer |
|---|---|---|
| D0 | P301 | GTIOC4B |
| D1 | P302 | GTIOC4A |
| D2 | P104 | GTIOC1B |
| D4 | P106 | GTIOC0B |
| D7 | P112 | GTIOC3B |
| D8 | P304 | GTIOC7A |
| D12 | P410 | GTIOC6B |
| D13 | P102 | GTIOC2B |
| D18 / SDA | P101 | GTIOC5A |
| D19 / SCL | P100 | GTIOC5B |
LED Matrix
The LED Matrix on the UNO R4 WiFi is available to use in your program, to display still graphics, animations, or even play games on. The UNO R4 Board Package includes the Arduino_LED_Matrix library for displaying frames on the matrix.
To learn about the LED matrix in depth, check out the LED Matrix Guide.
- Initialises a LED matrix.Arduino_LED_Matrix matrix
- Loads a frame into the frame buffer. Here's a basic example:Arduino_LED_Matrix.load()
1// creates an array of two frames2const uint32_t frames[][4] = {3 {4 0x0,5 0x0,6 0xc00c0000,7 1508 },9 {10 0x0,11 0x1e01,12 0x201201e0,13 15014 }15}16
17 // loads the frames into the matrix buffer18 matrix.load(frames);DAC
The UNO R4 WiFi also has a DAC with up to 12-bit resolution, that can act as a genuine analog output pin which means it's even more capable than PWM pins.
1analogWrite(pin, value);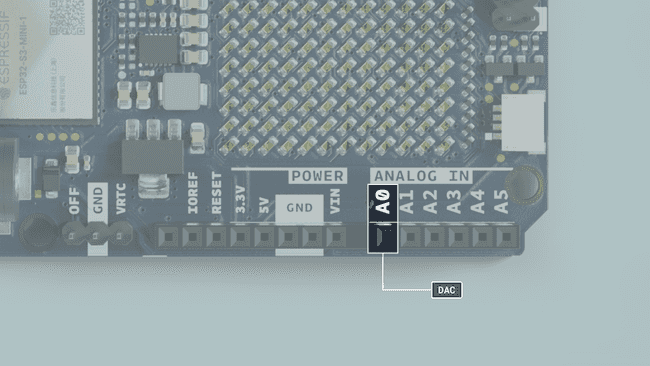
This DAC pin has a default write resolution of 8-bits. This means that values that are written to the pin should be between 0-255.
However you may change this write resolution if you need to, to up to 12-bits, and in this case the values you write to the pin should be between 0-4096.
1analogWriteResolution(12);To learn more about the DAC capabilities of the UNO R4 WiFi, check out the DAC Guide.
RTC
A real-time clock (RTC) is used to measure the time, and is useful in any time-tracking applications.
The UNO R4 WiFi features a VRTC pin, that is used to keep the onboard RTC running, even when the boards power supply is is cut off. In order to use this, apply a voltage in the range of 1.6 - 3.6 V to the VRTC pin.
Below is a minimal example that shows how to obtain the date and time from the RTC:
1#include "RTC.h"2
3void setup() {4 Serial.begin(9600);5
6 RTC.begin();7 RTCTime mytime(30, Month::JUNE, 2023, 13, 37, 00, DayOfWeek::WEDNESDAY, SaveLight::SAVING_TIME_ACTIVE);8
9 RTC.setTime(mytime);10}11
12void loop() {13 RTCTime currenttime;14
15 // Get current time from RTC16 RTC.getTime(currenttime);17 18 // Print out date (DD/MM//YYYY)19 Serial.print(currenttime.getDayOfMonth());20 Serial.print("/");21 Serial.print(Month2int(currenttime.getMonth()));22 Serial.print("/");23 Serial.print(currenttime.getYear());24 Serial.print(" - ");25
26 // Print time (HH/MM/SS)27 Serial.print(currenttime.getHour());28 Serial.print(":");29 Serial.print(currenttime.getMinutes());30 Serial.print(":");31 Serial.println(currenttime.getSeconds());32
33 delay(1000);34}To learn more about the RTC capabilities of the UNO R4 WiFi, check out the RTC Guide.
EEPROM
EEPROM, also referred to as 'data' memory, is type of memory that can retain data even after the board has been powered off.
1EEPROM.write(address, val);2EEPROM.read(address);It has a limited amount of write cycles, meaning that it is best suited for read-only applications. Make sure to never use
write()void loop()Read more in the Guide to EEPROM.
To learn more about the EEPROM capabilities of the UNO R4 WiFi, check out the EEPROM Guide.
SPI
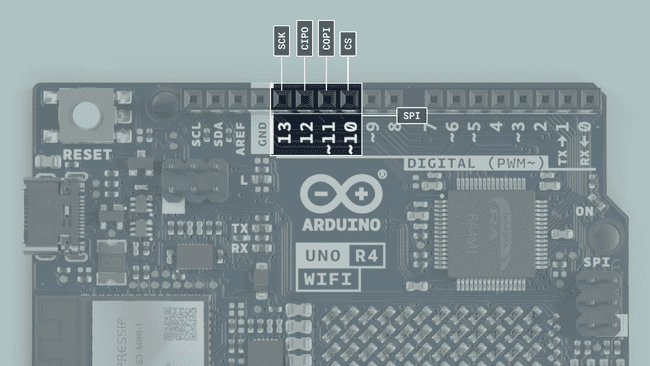
The UNO R4 WiFi features a Serial Peripheral Interface (SPI) bus. The bus (connector), ‘SPI’ uses the following pins:
- (COPI) - D11
- (CIPO) - D12
- (SCK) - D13
- (CS) - D10
The following example shows how to use SPI:
1#include <SPI.h>2
3const int CS = 10;4
5
6void setup() {7 pinMode(CS, OUTPUT);8
9 SPI.begin();10
11 digitalWrite(CS, LOW);12
13 SPI.transfer(0x00);14 15 digitalWrite(CS, HIGH);16}17
18void loop() {19}I2C
I2C lets you connect multiple I2C compatible devices in series using only two pins. The controller will send out information through the I2C bus to a 7-bit address, meaning that the technical limit of I2C devices on a single line is 128. Practically, you're never gonna reach 128 devices before other limitations kick in.
The UNO R4 WiFi has one I2C bus which is marked with SCL and SDA. They are shared with A4 (SDA) and A5 (SCL) which owners of previous UNO's are familiar with. The pullups are not mounted on the PCB but there are footprints to do so if needed.
The pins used for I2C on the UNO R4 WiFi are the following:
- SDA - D14
- SCL - D15
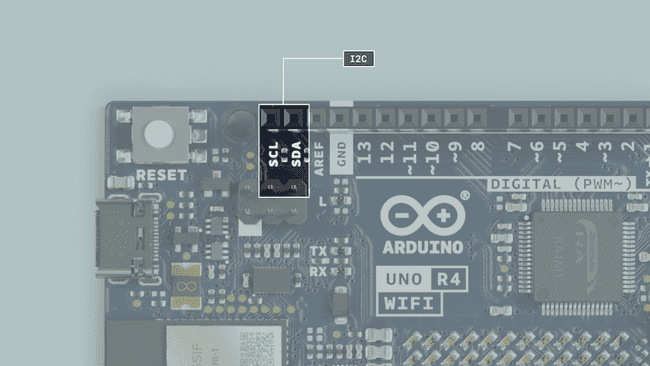
To connect I2C devices you will need to include the Wire library at the top of your sketch.
1#include <Wire.h>Inside
void setup()1Wire.begin() //SDA & SDL2Wire1.begin(); //SDA1 & SDL13Wire2.begin(); //SDA2 & SDL2And to write something to a device connected via I2C, we can use the following commands:
1Wire.beginTransmission(1); //begin transmit to device 12Wire.write(byte(0x00)); //send instruction byte 3Wire.write(val); //send a value4Wire.endTransmission(); //stop transmitQWIIC Connector
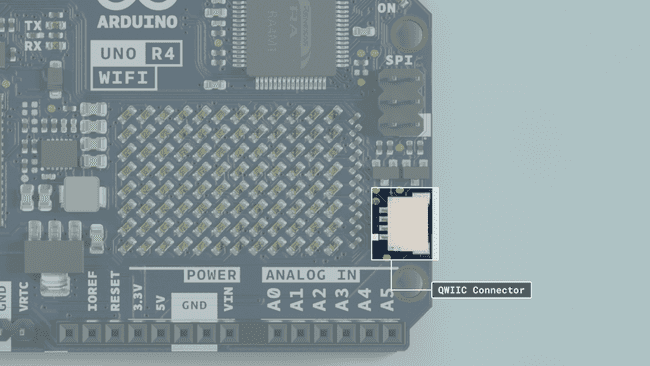
The Qwiic connector on the UNO R4 WiFi is connected to the secondary I2C bus (IIC0), which uses the
object rather than the Wire1
object. Please note that the Qwiic connector is 3.3 V only.Wire
The UNO R4 WiFi features a Qwiic/STEMMA connector that you can use to connect modules, often allowing you to daisy chain several modules and control all of them through a single connector.
Qwiic or STEMMA are both names for a type of connector developed by SparkFun and Adafruit respectively, that bundles the I2C pins of a development board and breakout modules. What this means is that if you have a development board (such as for example the Arduino UNO R4 WiFi) and a breakout module, and both have a Qwiic or STEMMA connector, you can hook them up together and with absolutely minimal wiring you can quickly create multi-faceted projects.
If your breakout board features more than one of these connectors, which many do, you can use the second one to daisychain another Qwiic module to add another interactive node to your project.
The UNO R4 WiFi features two I2C buses, and the Qwiic connector is connected to the secondary one. What this means is that if you are using the Wire library, you will need to use the
Wire1Wire1#include <Wire.h>2
3void setup(){4 Wire1.begin();5 Wire1.beginTransmission(1); //begin transmit to device 16 Wire1.write(byte(0x00)); //send instruction byte 7 Wire1.write(val); //send a value8 Wire1.endTransmission(); //stop transmit9}USB Serial & UART
The UNO R4 WiFi board features 2 separate hardware serial ports.
- One port is exposed via USB-C®, and
- One is exposed via RX/TX pins.
This is one of the few things that are distinctly different from UNO R3 to UNO R4, as the UNO R3 only features one hardware serial port, that is connected to both the USB port and the RX/TX pins on the board.
The pins used for UART on the UNO R4 WiFi are the following:
| Pin | Function |
|---|---|
| D0 | RX (Receive) |
| D1 | TX (Transmit) |
Native USB
Sending serial data to your computer is done using the standard
Serial1Serial.begin(9600);2Serial.print("hello world");To send and receive data through UART, we will first need to set the baud rate inside
void setup()UART
The pins used for UART on the UNO R4 WiFi are the following:
| Pin | Function |
|---|---|
| D0 | RX0 |
| D1 | TX0 |
To send and receive data through UART, we will first need to set the baud rate inside
void setup()Serial11Serial1.begin(9600);To read incoming data, we can use a while loop() to read each individual character and add it to a string.
1while(Serial1.available()){2 delay(2);3 char c = Serial1.read();4 incoming += c;5 }And to write something, we can use the following command:
1Serial1.write("Hello world!");Serial Event
The serialEvent() method is supported on older revisions of the UNO board, but not on the UNO R4 boards (or any other newer Arduino boards).
However, as this method is only used to detect serial data and execute a function, you can also use
Serial.available()1if(Serial.available() > 0) {2 //code goes here3}Timers
In the Ardunio API there is a
class which provides all the necessary functionality for using timers in a sketch.FspTimer
The UNO R4 WiFi has two timer peripherals, a Asynchronous General Purpose Timer (AGT) and a General PWM Timer (GPT). There are two AGT timers on the board, one of them is used for time measuring methods such as
millis()microseconds()The board has 7 GPT timers to help perform PWM tasks, such as calculating duty cycles by measuring how long a signal is active. It is possible to use these reserved PWM timers by using the previously mentioned
library. Using this function will explicitly request a PWM timer:FspTimer
1FspTimer::force_use_of_pwm_reserved_timer();When using the timer functions of the library you will need to enter the timers type. Which is either AGT or GPT. This can be declared in the sketch like this:
1uint8_t gpt_timer_type = GPT_TIMER;2uint8_t agt_timer_type = AGT_TIMER;SerialUSB
The UNO R4 WiFi has an extended set of Serial methods that can be enabled whenever you include the
<HID.h>
- Returns the baud rate (int) currently used.Serial.baud()
- Returns the number of stop bits (int) used in the communication.Serial.stopbits()
- Returns the type of parity (int) used in the communication.Serial.paritytype()
- Returns the number of data bits (int) used in the communication.Serial.numbits()
- Returns the status of the Data Terminal Ready (DTR) signal (bool) and also sets the- ignore_dtr flag to true if the DTR signal is actively used.Serial.dtr()
- Returns the status of the Request to Send (RTS) signal (bool).Serial.rts()
The
<HID.h>SerialSerialUSBSupported links:
- SerialUSB.h (Github).
USB HID
Please note that due to how the USB port is implemented on the UNO R4 WiFi, when using HID the board may show up as a different USB port. If this happens, simply double-tap the reset button, and select your board again.
This board can act as an HID (keyboard/mouse) and send keystrokes or coordinates to your computer via native USB.
1keyboard.press('W');2mouse.move(x,y);This support is enabled by the keyboard and mouse libraries that you can install from the library manager in the IDE.
To learn more about the HID capabilities of the UNO R4 WiFi, check out the HID Guide.
Serial Remap
Whenever the
<HID.h>SerialSerialUSBSupported links:
- HID.h (Github)
CAN Module
The UNO R4 WiFi's RA4M1 has a built-in CAN module that complies with the CAN 2.0A/CAN 2.0B standard.
The pins CANRX and CANTX can be connected to a CAN transceiver, such as a MCP2551 or TJA1050 ICs.
| Pin | Function |
|---|---|
| D10 | CANRX |
| D13 | CANTX |
The built-in Arduino_CAN library is used to communicate with other CAN devices.
1//set CAN bit rate and init library at2//choose from BR_125k,BR_250k,BR_500k,BR_1000k 3CAN.begin(CanBitRate::BR_250k);Construct a CAN message and send it:
1uint8_t const msg_data[] = {0xCA,0xFE,0,0,0,0,0,0};2memcpy((void *)(msg_data + 4), &msg_cnt, sizeof(msg_cnt));3CanMsg msg(CAN_ID, sizeof(msg_data), msg_data);4CAN.write(msg);Read an incoming CAN message.
1CanMsg const msg = CAN.read(); //readPlease note that without a CAN transceiver it is not possible to communicate with other CAN devices.
To learn more about the CAN capabilities of the UNO R4 WiFi, check out the CAN Guide.
ESP32-S3-MINI-1-N8
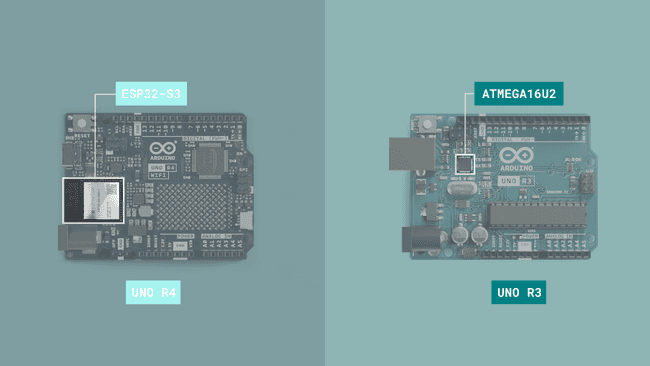
By default, the ESP32-S3 module onboard the UNO R4 WiFi acts as a Serial bridge, handling the connection to your computer. It also handles the rebooting of the main MCU, the Renesas RA4M1 when it is needed, for example when receiving a new sketch and resetting.
On the UNO R3, the ATMEGA16U2 serves the same purpose. The onboard ESP32 module is a more advanced SoC, adding Wi-Fi® & Bluetooth® connectivity to the board.
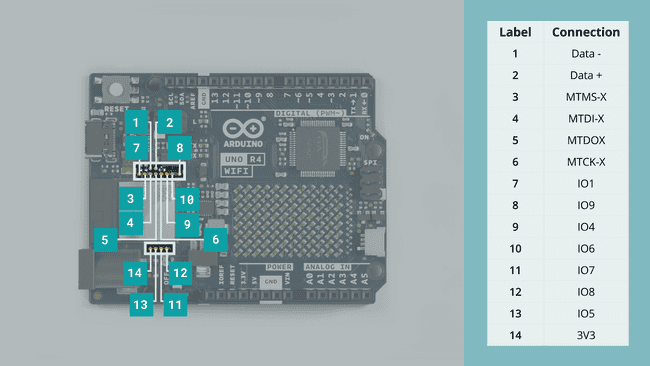
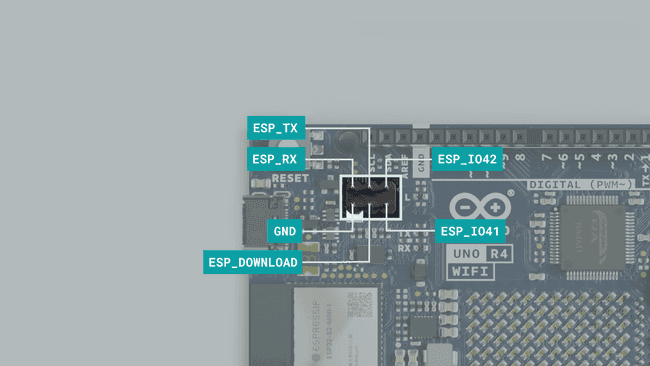
The ESP32 also exposes the ESP32's data lines, so that you can program the ESP32 directly. These data lines are exposed by 3x2 header at the top of the board, or through pads on the bottom side.
Please note that the ESP32 has a default firmware installed, which is set to communicate with the RA4M1 chip. Any direct programming of the ESP32 will override that firmware and the communication between the chips may be disrupted until the default firmware is restored.
USB Bridge
By default the ESP32 acts as a serial bridge between a computer and the RA4M1 MCU. The USB data lines are routed through switches, and by default, these switches are set for communication to go via the ESP32 module.
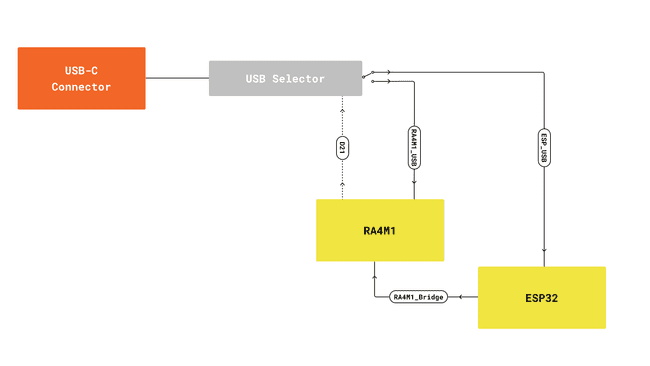
If you wish you can change this and get direct access to the serial bus on the RA4M1 MCU either with software or hardware. See the instructions below:
- Software - By pulling D21 to HIGH you will close the circuit that controls which MCU is connected to USB. While D21 is HIGH, the RA4M1 is connected to the USB Serial port, and while D21 is LOW the ESP32 is connected, like the default configuration.
You can do this by including the following code in
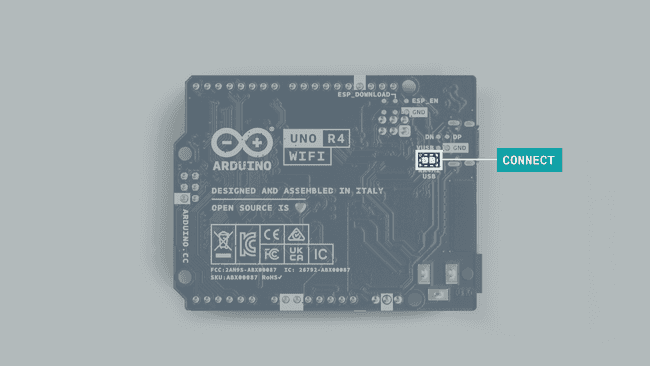
void setup()1pinMode(21, OUTPUT);2digitalWrite(21, HIGH); - On the back of the UNO R4 WiFi you will find solder pads labelled "RA4M1 USB". If you create a short circuit between these pads, by for example creating a bridge across them with solder, the RA4M1 will be connected to the USB Serial port, instead of the ESP32.
Wi-Fi®
The ESP32 onboard the UNO R4 WiFi is used to give the board Wi-Fi® capabilities. The Wi-Fi® module has a bitrate of up to 150 Mbps. The ESP32 module has a built in trace-antenna, meaning that you do not need an external one to use the connectivity features of the board. However, this trace antenna is shared with the Bluetooth® module, which means that you cannot use Bluetooth® and Wi-Fi® at the same time.
To use the Wi-Fi® features of the UNO R4 WiFi, use the WiFiS3 library that is built in to the UNO R4 Board Package.
To learn more about the Wi-Fi® capabilities of the UNO R4 WiFi, try out the Network Examples.
Bluetooth®
Thanks to the ESP32 module, the UNO R4 WiFi has Bluetooth® LE and Bluetooth® 5 capabilities, at a speed of up to 2 Mbps. The ESP32 module has a built in trace-antenna, meaning that you do not need an external one to use the connectivity features of the board. However, this trace antenna is shared with the Bluetooth® module, which means that you cannot use Bluetooth® and Wi-Fi® at the same time.
Below is an example sketch scans for bluetooth devices:
1#include <ArduinoBLE.h>2
3void setup() {4 Serial.begin(9600);5 while (!Serial);6
7 // begin initialization8 if (!BLE.begin()) {9 Serial.println("starting Bluetooth® Low Energy module failed!");10
11 while (1);12 }13
14 Serial.println("Bluetooth® Low Energy Central - Peripheral Explorer");15
16 // start scanning for peripherals17 BLE.scan();18}19
20void loop() {21 // check if a peripheral has been discovered22 BLEDevice peripheral = BLE.available();23
24 if (peripheral) {25 // discovered a peripheral, print out address, local name, and advertised service26 Serial.print("Found ");27 Serial.print(peripheral.address());28 Serial.print(" '");29 Serial.print(peripheral.localName());30 Serial.print("' ");31 Serial.print(peripheral.advertisedServiceUuid());32 Serial.println();33
34 // check for peripheral's name35 if (peripheral.localName() == "<PERIPHERAL_NAME>") {36 // stop scanning37 BLE.stopScan();38
39 explorerPeripheral(peripheral);40
41 // peripheral disconnected, we are done42 while (1) {43 // do nothing44 }45 }46 }47}48
49void explorerPeripheral(BLEDevice peripheral) {50 // connect to the peripheral51 Serial.println("Connecting ...");52
53 if (peripheral.connect()) {54 Serial.println("Connected");55 } else {56 Serial.println("Failed to connect!");57 return;58 }59
60 // discover peripheral attributes61 Serial.println("Discovering attributes ...");62 if (peripheral.discoverAttributes()) {63 Serial.println("Attributes discovered");64 } else {65 Serial.println("Attribute discovery failed!");66 peripheral.disconnect();67 return;68 }69
70 // read and print device name of peripheral71 Serial.println();72 Serial.print("Device name: ");73 Serial.println(peripheral.deviceName());74 Serial.print("Appearance: 0x");75 Serial.println(peripheral.appearance(), HEX);76 Serial.println();77
78 // loop the services of the peripheral and explore each79 for (int i = 0; i < peripheral.serviceCount(); i++) {80 BLEService service = peripheral.service(i);81
82 exploreService(service);83 }84
85 Serial.println();86
87 // we are done exploring, disconnect88 Serial.println("Disconnecting ...");89 peripheral.disconnect();90 Serial.println("Disconnected");91}92
93void exploreService(BLEService service) {94 // print the UUID of the service95 Serial.print("Service ");96 Serial.println(service.uuid());97
98 // loop the characteristics of the service and explore each99 for (int i = 0; i < service.characteristicCount(); i++) {100 BLECharacteristic characteristic = service.characteristic(i);101
102 exploreCharacteristic(characteristic);103 }104}105
106void exploreCharacteristic(BLECharacteristic characteristic) {107 // print the UUID and properties of the characteristic108 Serial.print("\tCharacteristic ");109 Serial.print(characteristic.uuid());110 Serial.print(", properties 0x");111 Serial.print(characteristic.properties(), HEX);112
113 // check if the characteristic is readable114 if (characteristic.canRead()) {115 // read the characteristic value116 characteristic.read();117
118 if (characteristic.valueLength() > 0) {119 // print out the value of the characteristic120 Serial.print(", value 0x");121 printData(characteristic.value(), characteristic.valueLength());122 }123 }124 Serial.println();125
126 // loop the descriptors of the characteristic and explore each127 for (int i = 0; i < characteristic.descriptorCount(); i++) {128 BLEDescriptor descriptor = characteristic.descriptor(i);129
130 exploreDescriptor(descriptor);131 }132}133
134void exploreDescriptor(BLEDescriptor descriptor) {135 // print the UUID of the descriptor136 Serial.print("\t\tDescriptor ");137 Serial.print(descriptor.uuid());138
139 // read the descriptor value140 descriptor.read();141
142 // print out the value of the descriptor143 Serial.print(", value 0x");144 printData(descriptor.value(), descriptor.valueLength());145
146 Serial.println();147}148
149void printData(const unsigned char data[], int length) {150 for (int i = 0; i < length; i++) {151 unsigned char b = data[i];152
153 if (b < 16) {154 Serial.print("0");155 }156
157 Serial.print(b, HEX);158 }159}If you want to learn more about Bluetooth LE check out our article here.
Programming the ESP32 (Advanced)
The ESP32 module and the Renesas RA4M1-chip are part of a sophisticated USB-Serial system that is highly flexible and adaptive to allow for HID features while still keeping the ability to program both the main MCU, and the ESP32, if you so wish. By default, the ESP32's is used mainly as a radio module using Wi-Fi® and Bluetooth®.
Overwriting the ESP32's firmware disrupts the communication between the two MCUs, but enables them to act independently. If you wish to restore the board to its initial state, you can follow the steps for espflash in our Help Center article.
Note: To reprogram the ESP32 module, you need to short the ESP_Download pin to GND while resetting the board. This will put the ESP32 module in a bootloader state where you can establish a connection to it and reprogram the module.
To reprogram the ESP32 board you can either find UART-pads next to the ESP32 Module, that are laid out as shown in the image below:
or you can use the pins exposed directly on the ESP32 header, shown here:
Suggest changes
The content on docs.arduino.cc is facilitated through a public GitHub repository. If you see anything wrong, you can edit this page here.
License
The Arduino documentation is licensed under the Creative Commons Attribution-Share Alike 4.0 license.