Wi-Fi® / ESP32
Setup and configure Wi-Fi® devices in the Arduino Cloud.
A number of official Arduino boards support a connection to the Arduino Cloud via Wi-Fi®. Some boards also have an onboard crypto chip that stores the credentials automatically when configuring the device.
There are currently two ways of configuring a Wi-Fi® board:
- By configuring an onboard crypto chip (available for a number of official Arduino boards only).
- Through a Secret Key / API key (ESP32/ESP8266 based boards*).
*Note that the UNO R4 WiFi and Nano ESP32 boards use this method.
Supported Boards
Connection via Wi-Fi® is an easy alternative, and your credentials can safely be entered during the configuration of a project. This type of connection is most suitable for low-range projects, where you connect your board to the Cloud via your home/work/school network router.
Configure Wi-Fi® Boards
List of Wi-Fi® Boards
The following boards connect to the Arduino Cloud via Wi-Fi®, using the onboard encryption:
- MKR WiFi 1010
- Nano RP2040 Connect
- Nano 33 IoT
- GIGA R1 WiFi
- Portenta H7
- Portenta H7 Lite Connected
- Portenta Machine Control
- Nicla Vision
- Opta
Setup a Wi-Fi® Board
To configure a Wi-Fi® board in the Arduino Cloud, follow the steps below:
1. Connect your board to your computer.
2. Go to Arduino Cloud, and navigate to the "Devices" section. Click on the "Add Device" button and then select the "Arduino Board". After a while, your board will be visible, and you can click on the "Configure" button.

3. Allow some time for the configuration, as a sketch is being uploaded to your board and your crypto chip is configured.
Once done, your board is configured and ready to be used in the Arduino Cloud.
After setting up a device, you can check out the official Getting Started (Arduino / C++) guide. This will guide you to successfully send data between your board and Arduino Cloud.
Configure ESP Boards
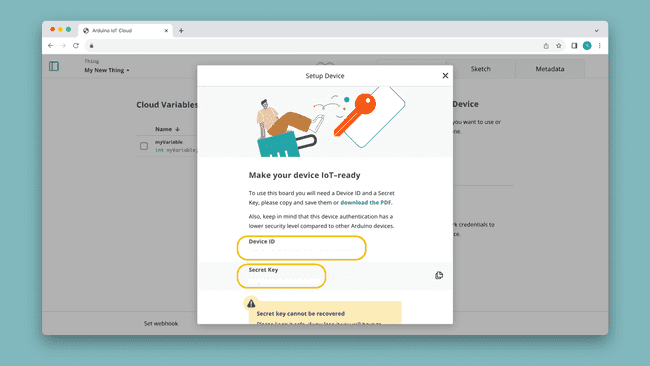
ESP32 / ESP8266 based boards connect to the Arduino Cloud via a secret key, generated during device configuration.
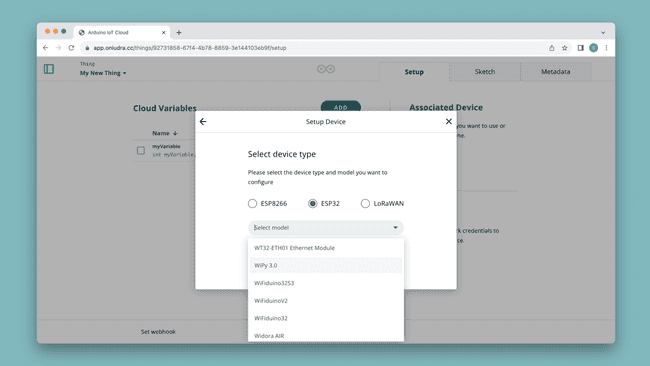
There is a large number of ESP32/ESP8266 supported boards, which you select from a drop-down menu.

If you don't find your board in the list, just select the ESP32 model (e.g.
).ESP32S3 Dev Module
The following official boards have an ESP32 as main/co-processor and connect using a secret key as well.
Setup ESP32/ESP8266 Boards
To configure an ESP32 board in the Arduino Cloud, follow the steps below:
1. Connect your board to your computer.
2. Go to Arduino Cloud, and navigate to the "Devices" section. Click on the "Add Device" button and then select the "Third Party Board".

3. Select your board type, and give your board a name. When finished, you will generate a secret key and device ID. You can download or manually store your credentials somewhere, but the secret key can not be retrieved after you close the window.
If you lose your Secret Key or forget to download and store your information you will need to remove and set up the device again.

Your ESP32/ESP8266 board is now configured and ready to be used in the Arduino Cloud.
After setting up a device, you can check out the official Getting Started (Arduino / C++) guide. This will guide you to successfully send data between your board and Arduino Cloud.
Verified ESP32 Boards Supporting OTA
Over-the-air (OTA) allows you to remotely upload sketches to your board without a physical connection over USB.
The following ESP32 boards have been tested and verified to support OTA:
- ESP32-S2-DevKitC
- NODEMCU-32-S2
- WEMOS LOLIN D32
- ESP32-S3-DevKitC
- WEMOS LOLIN D32
- ESP32-CAM
- NodeMCU-32S
- Freenove ESP32 WROVER
- ESP32-DevKitC32E
- DOIT ESP32 DevKit v1
Supported Frequencies
All official Arduino boards currently only support the 2.4GHz frequency band for transmitting data.
Suggest changes
The content on docs.arduino.cc is facilitated through a public GitHub repository. If you see anything wrong, you can edit this page here.
License
The Arduino documentation is licensed under the Creative Commons Attribution-Share Alike 4.0 license.