RobotLogo
Tell your robot where to go through the on-board keyboard.
Logo
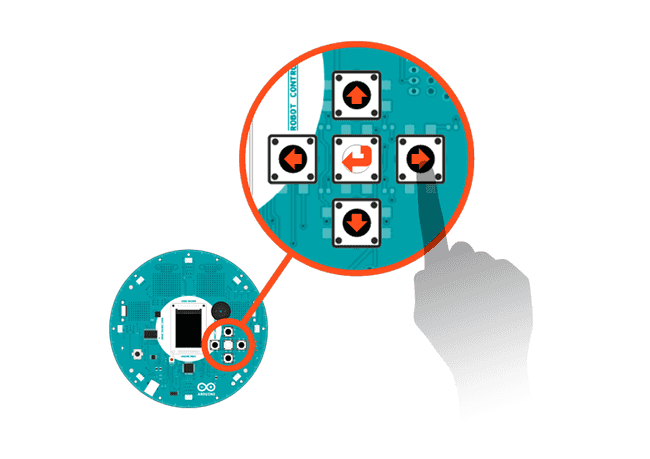
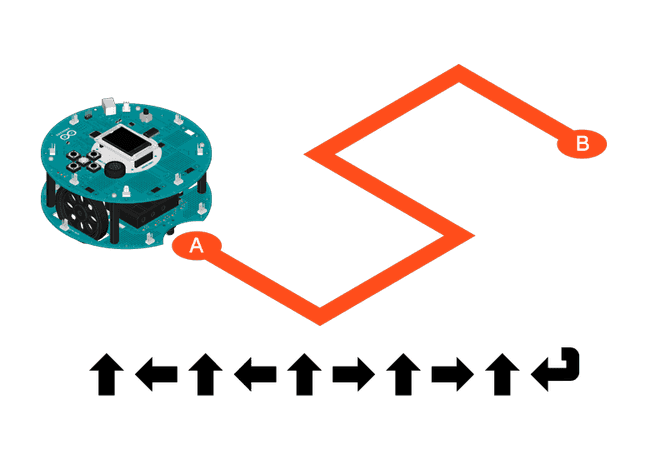
This sketch shows you basic movement with the Robot. When the sketch starts, press the buttons ont he control board to indicate the direction you want the robot to move. After you've keyed in your sequence (up to 20 steps at a time), press the middle button to record the steps to memory. Put your robot on the floor for it to follow the directions you programmed.
Hardware Required
- Arduino Robot
Instruction
Upload the example, unplug USB and turn on power
Place the robot on the floor, in a clear space, so it can move around.
After the starting images on the screen, the robot will ask you to add commands.
Press the buttons according to how you want the robot to move; the commands will be stored and executed later.
Left makes the robot turn left for 90 degrees, right makes it turn right. Up makes the robot go forward for 1 second, down makes it go backwards for 1 second.
After you're done with the commands, press the middle button. The robot will start executing the commands in order. At most, the robot will remember 20 commands. If you fill them all, the robot will start executing before you press the middle button
After running the sequence, the robot will return to the 3rd step. Adjust your commands and do it again!
Try it out


Code
First, explain the code line by line
1/* Robot Logo2
3 This sketch demonstrates basic movement of the Robot.4
5 When the sketch starts, press the on-board buttons to tell6
7 the robot how to move. Pressing the middle button will8
9 save the pattern, and the robot will follow accordingly.10
11 You can record up to 20 commands. The robot will move for12
13 one second per command.14
15 This example uses images on an SD card. It looks for16
17 files named "lg0.bmp" and "lg1.bmp" and draws them on the18
19 screen.20
21 Circuit:22
23 * Arduino Robot24
25 created 1 May 201326
27 by X. Yang28
29 modified 12 May 201330
31 by D. Cuartielles32
33 This example is in the public domain34
35 */36
37#include <ArduinoRobot.h> // include the robot library38#include <Wire.h>39
40int commands[20]; // array for storing commands41
42void setup() {43
44 // initialize the Robot, SD card, and display45
46 Robot.begin();47
48 Robot.beginTFT();49
50 Robot.beginSD();51
52 // draw "lg0.bmp" and "lg1.bmp" on the screen53
54 Robot.displayLogos();55}56
57void loop() {58
59 Robot.drawBMP("intro.bmp", 0, 0); //display background image60
61 iniCommands(); // remove commands from the array62
63 addCommands(); // add commands to the array64
65 delay(1000); // wait for a second66
67 executeCommands(); // follow orders68
69 Robot.stroke(0, 0, 0);70
71 Robot.text("Done!", 5, 103); // write some text to the display72
73 delay(1500); // wait for a moment74}75
76// empty the commands array77void iniCommands() {78
79 for (int i = 0; i < 20; i++) {80
81 commands[i] = -1;82
83 }84}85
86// add commands to the array87void addCommands() {88
89 Robot.stroke(0, 0, 0);90
91 // display text on the screen92
93 Robot.text("1. Press buttons to\n add commands.\n\n 2. Middle to finish.", 5, 5);94
95 // read the buttons' state96
97 for (int i = 0; i < 20;) { //max 20 commands98
99 int key = Robot.keyboardRead();100
101 if (key == BUTTON_MIDDLE) { //finish input102
103 break;104
105 } else if (key == BUTTON_NONE) { //if no button is pressed106
107 continue;108
109 }110
111 commands[i] = key; // save the button to the array112
113 PrintCommandI(i, 46); // print the command on the screen114
115 delay(100);116
117 i++;118
119 }120}121
122// run through the array and move the robot123void executeCommands() {124
125 // print status to the screen126
127 Robot.text("Executing...", 5, 70);128
129 // read through the array and move accordingly130
131 for (int i = 0; i < 20; i++) {132
133 switch (commands[i]) {134
135 case BUTTON_LEFT:136
137 Robot.turn(-90);138
139 break;140
141 case BUTTON_RIGHT:142
143 Robot.turn(90);144
145 break;146
147 case BUTTON_UP:148
149 Robot.motorsWrite(255, 255);150
151 break;152
153 case BUTTON_DOWN:154
155 Robot.motorsWrite(-255, -255);156
157 break;158
159 case BUTTON_NONE:160
161 return;162
163 }164
165 // print the current command to the screen166
167 Robot.stroke(255, 0, 0);168
169 PrintCommandI(i, 86);170
171 delay(1000);172
173 // stop moving for a second174
175 Robot.motorsStop();176
177 delay(1000);178
179 }180}181
182// convert the button press to a single character183char keyToChar(int key) {184
185 switch (key) {186
187 case BUTTON_LEFT:188
189 return '<';190
191 case BUTTON_RIGHT:192
193 return '>';194
195 case BUTTON_UP:196
197 return '^';198
199 case BUTTON_DOWN:200
201 return 'v';202
203 }204}205
206// display a command207void PrintCommandI(int i, int originY) {208
209 Robot.text(keyToChar(commands[i]), i % 14 * 8 + 5, i / 14 * 10 + originY);210}Suggest changes
The content on docs.arduino.cc is facilitated through a public GitHub repository. If you see anything wrong, you can edit this page here.
License
The Arduino documentation is licensed under the Creative Commons Attribution-Share Alike 4.0 license.