Sending an Email Through IFTTT with Nano 33 IoT
Learn how to connect the Nano 33 IoT to IFTTT to send an email each time an action is performed
In this tutorial we will use an Arduino Nano 33 IoT, to send and email using an online automation tool that connects applications and services, named IFTTT.
Goals
The goals of this project are:
- Learn what an online automation tool is.
- Understand what the NINA-W102 module is.
- Use the WiFiNINA library.
- Learn how to connect Arduino to a service.
- Learn how to send an email from the Arduino Web Editor using online automation tools.
Hardware & Software Needed
- This project uses no external sensors or components.
- In this tutorial we will use the Arduino Web Editor to program the board.
Online Automation Tools
An online automation tool is used to connect applications and services to automate repetitive tasks without having to code that process or relying on developers to build the integration. The workflows followed by these tools are "If this, do this". The first part of the process (if this), starts with a trigger, the trigger could be anything from turning on a light, to posting something on your Instagram account. The second part (do this), will run an action step of your choice, every time the set trigger event occurs. For example: if a new row is added to a google spreadsheet, then send me and email.
The NINA-W102 Module
The NINA-W102 module is a stand-alone multiradio MCU modules module that integrate a powerful microcontroller (MCU) and a radio for wireless communication. The radio provides support for Wi-Fi 802.11 b/g/n in the 2.4 Hz ISM band and Bluetooth® v4.2 (Bluetooth® BR/EDR and Bluetooth® low energy) communications.
If you want to learn more about Wi-Fi and how it works, you can check this link.
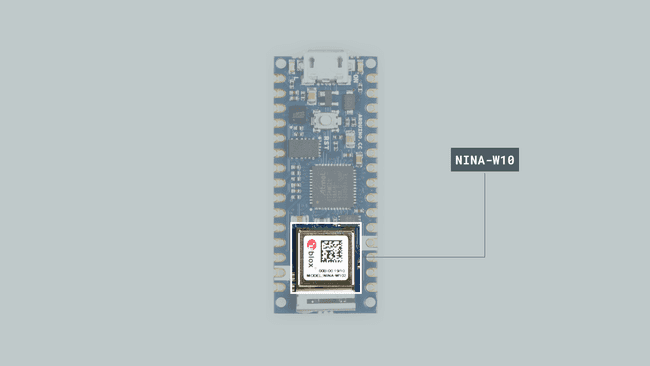
The NINA-W102 includes the wireless MCU, Flash memory, crystal, and components for matching, filtering, antenna and decoupling, making it a very compact stand-alone multiradio module. The module can be used to design solutions with top grade security, thanks to integrated cryptographic hardware accelerators.
The Library
The WiFiNINA library allows us to use the Arduino Nano 33 IoT NINA-W102 module, without having to go into complicated programming. The library supports WEP, WPA2 Personal and WPA2 Enterprise encryptions and it can serve as either a server accepting incoming connections or a client making outgoing ones. Some of the most common applications for the module are the following:
- Internet of Things
- Wi-Fi networks
- Bluetooth® and Bluetooth® low energy applications
- Telematics
- Access to laptops, mobile phones, and similar consumer devices
- Medical and industrial networking
- Home/building automation
If you want to read more about the NINA-W102 module see here.
In this tutorial we will use the library to connect the board to the Wi-Fi network and send a HTTP request to a specific URL to trigger an action.
Creating the Program
1. Setting up
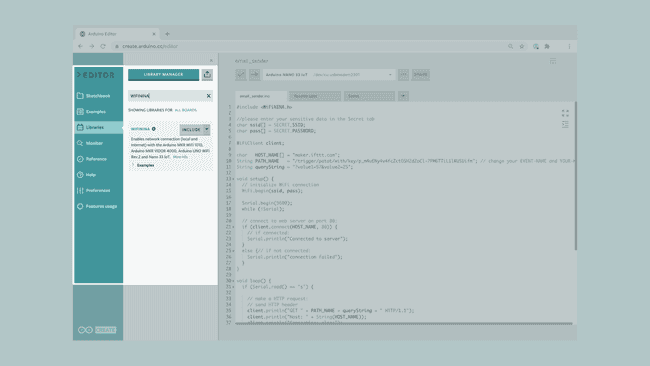
Let's start by opening the Arduino Web Editor, create a new sketch and name it email_sender. Then, navigate to the Libraries tab, search for the WIFININA library and click on the Include button.
2. Connecting the board
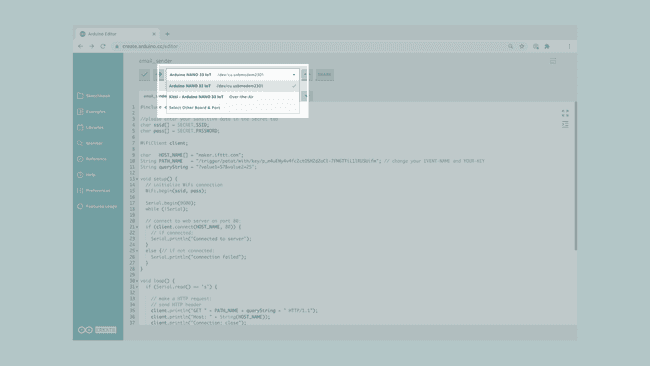
Next, connect the Arduino Nano 33 IoT to the computer and make sure that the Web Editor recognizes it. If so, the board and port should appear as shown in the image below. If they don't appear, follow the instructions to install the plugin that will allow the Editor to recognize your board.
3.Sending the HTTP request
After including the library, we can begin by building the code.
Let's start by creating a secret header file to store our credential for the Wi-Fi network which we will connect to. In this way we don't accidentally store our credentials in a code we may share on the internet. To do this, we need to click the downward arrow next to our sketch tab, and click Add Secret Tab. This will create a tab called Secret.
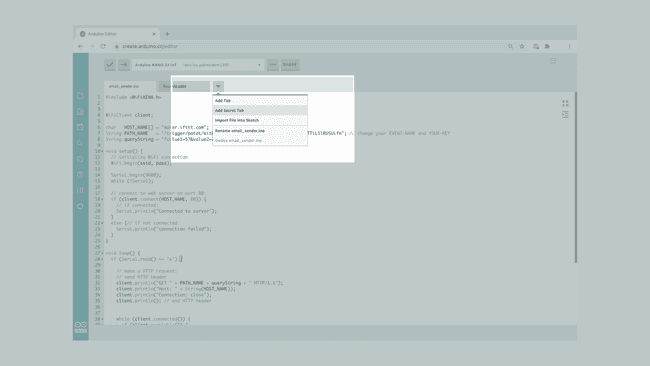
We now need to head back to the original sketch file, and enter the following code:
1//please enter your sensitive data in the Secret tab2char ssid[] = SECRET_SSID; // your network SSID (name)3char pass[] = SECRET_PASS; // your network password (use for WPA, or use as key for WEP)This will automatically create two fields in the Secret tab. If we go back to this tab, we can enter our credentials there.
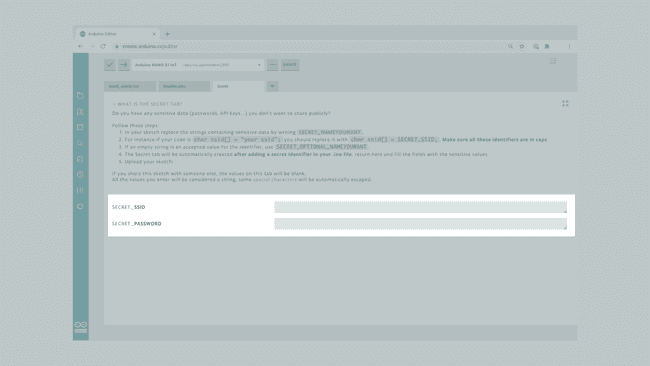
Now that are network credentials are safe, we can go back to the sketch and continue coding. We need to create a client that can connect to a specified internet IP address and port, using the
WiFiClientclient1WiFiClient client;Then, we need to initialize three new variables called
HOST_NAME[]PATH_NAMEqueryString1char HOST_NAME[] = "maker.ifttt.com";2String PATH_NAME = "/trigger/event-name/with/key/your-key"; // change your EVENT-NAME and YOUR-KEY3String queryString = "?value1=57&value2=25";Note: Keep in mind that the
will be updated once we create the action on the online automation tool.PATH_NAME
In the
setup()WiFi.begin()while(!Serial)if else1void setup() {2 // initialize WiFi connection3 WiFi.begin(ssid, pass);4
5 Serial.begin(9600);6 while (!Serial);7
8 // connect to web server on port 80:9 if (client.connect(HOST_NAME, 80)) {10 // if connected:11 Serial.println("Connected to server");12 }13 else {// if not connected:14 Serial.println("connection failed");15 }16}Inside the
loop()if().println()1void loop() {2 if (Serial.read() == 's') {3
4 // make a HTTP request:5 // send HTTP header6 client.println("GET " + PATH_NAME + queryString + " HTTP/1.1");7 client.println("Host: " + String(HOST_NAME));8 client.println("Connection: close");9 client.println(); // end HTTP headerWe then add a function that will create a loop where while the client is connected (
while (client.connected())if (client.available())1while (client.connected()) {2 if (client.available()) {3 // read an incoming byte from the server and print it to serial monitor:4 char c = client.read();5 Serial.print(c);6 }7 }Lastly, we add a
.stop()Serial.println()1// the server's disconnected, stop the client:2 client.stop();3 Serial.println();4 Serial.println("disconnected");5 }6}4. Complete code
If you choose to skip the code building section, the complete code can be found below:
1#include <WiFiNINA.h>2
3//please enter your sensitive data in the Secret tab4char ssid[] = SECRET_SSID;5char pass[] = SECRET_PASSWORD;6
7WiFiClient client;8
9char HOST_NAME[] = "maker.ifttt.com";10String PATH_NAME = "/trigger/event-name/with/key/your-key"; // change your EVENT-NAME and YOUR-KEY11String queryString = "?value1=57&value2=25";12
13void setup() {14 // initialize WiFi connection15 WiFi.begin(ssid, pass);16
17 Serial.begin(9600);18 while (!Serial);19
20 // connect to web server on port 80:21 if (client.connect(HOST_NAME, 80)) {22 // if connected:23 Serial.println("Connected to server");24 }25 else {// if not connected:26 Serial.println("connection failed");27 }28}29
30void loop() {31 if (Serial.read() == 's') {32
33 // make a HTTP request:34 // send HTTP header35 client.println("GET " + PATH_NAME + queryString + " HTTP/1.1");36 client.println("Host: " + String(HOST_NAME));37 client.println("Connection: close");38 client.println(); // end HTTP header39
40
41 while (client.connected()) {42 if (client.available()) {43 // read an incoming byte from the server and print it to serial monitor:44 char c = client.read();45 Serial.print(c);46 }47 }48
49 // the server's disconnected, stop the client:50 client.stop();51 Serial.println();52 Serial.println("disconnected");53 }54}Testing It Out
First we need to create the trigger and the action of our choice, using an online automation tool. In this case, we will use the IFTTT (If This Then That) as our online automation tool, but you can use any tool you prefer. The process will be similar.
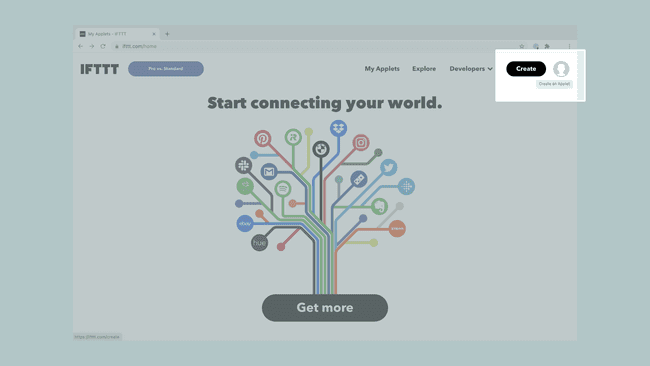
The first step is to log in, if you don't have an account you can create one. Then we need to click on the Create button on the top right. We will see the following:
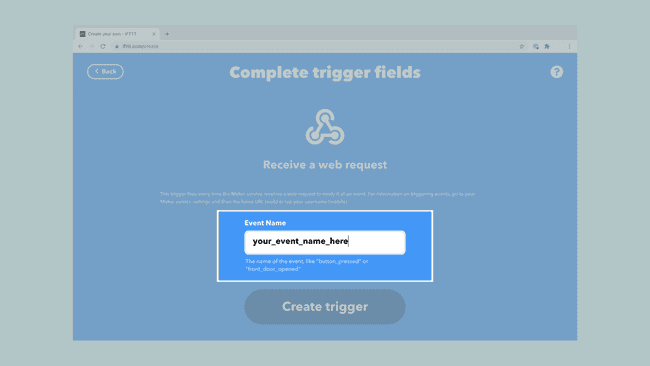
Now we need to click the Add button to add the trigger. We will see that we can choose a great amount of services to create a trigger, each of them consisting of different triggers. The one we need for this tutorial is called Webhooks, this services will activate the trigger every time the Maker services receives a web request. Click on Receive a web request and set an event name. We have set sketch_received as event name. Once we have chosen an event name click the Create trigger button.
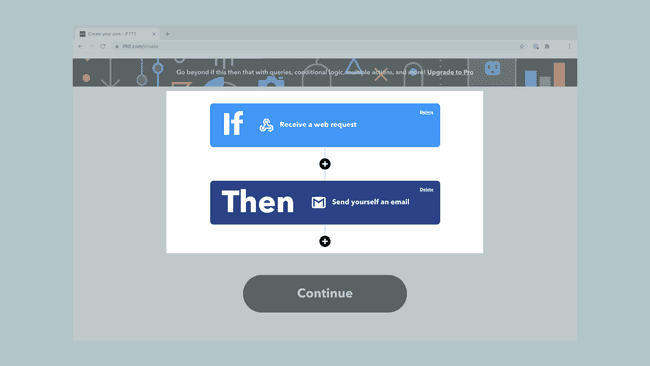
The next part is to create an action that will happen every time Webhooks receives a web request. Click the Add button on the Then That section. As before we can choose between a lot of applications and services, but the one we are going to use here is Gmail. The action will be to receive and email in your own account, so we need to click on the Send yourself an email action. Then we just need to set the subject, the body and if we want, attach an URL. Once we have set all the info we just need to click the Create action and then Continue. It should looks like the image below.
Once we have created the trigger and the action, we can change the title of the applet and click the Finish button. The last step is to click on the Webhooks symbol and on the Documentation button in the top right. Here we can see the Key. We need to copy this key, go to the sketch we created before and paste the key to the variable
PATH_NAMEyour-keyevent-namesketch_receivedEverything is ready! Now we just need to open the Serial Monitor, to see if the client is connected and whenever we enter an
s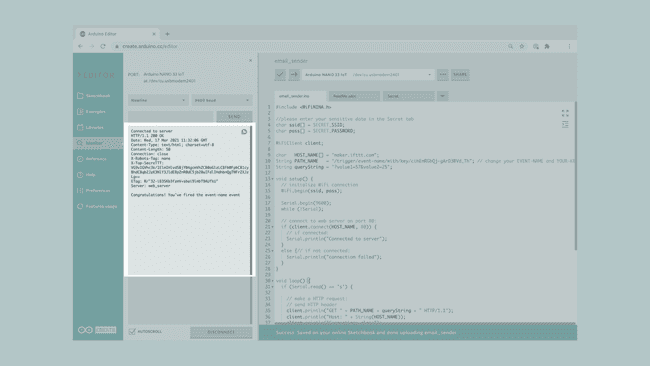
Troubleshoot
Sometimes errors occur, if the code is not working there are some common issues we can troubleshoot:
- Missing a bracket or a semicolon.
- Arduino board connected to the wrong port.
- We haven't opened the Serial Monitor to initialize the program.
- We haven't changed the event name or the key
Conclusion
In this tutorial, we have learned how to simply connect to a Wi-Fi network by using the credentials in the code and send a HTTP request. We also learned how to use an online automation tool to use the HTTP request as a trigger that will execute an action on a different application or service.
Suggest changes
The content on docs.arduino.cc is facilitated through a public GitHub repository. If you see anything wrong, you can edit this page here.
License
The Arduino documentation is licensed under the Creative Commons Attribution-Share Alike 4.0 license.